
Read on Kindle (1st Generation)
© 2018 Amazon.com, Inc. or its affiliates. All rights reserved.
Reading on Kindle (1st Generation)
Reading on your Kindle is like reading a printed book with some added features.
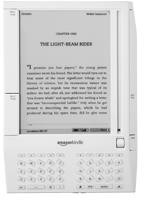
The layout in a Kindle book is as much like the printed book as possible. Each page has a header showing the content's title and the author or issue date.
At the bottom of each page, there are battery and wireless status indicators as well as a progress bar and location numbers. Locations are the digital alternative to page numbers. Page numbers on your Kindle vary depending on the text size you choose, but locations allow you to return to the same place regardless of text size.
You can choose from six different font sizes for content on your Kindle. The text size of menus and other screens is fixed and cannot be modified.
To change the text size: Press the text-size key in the lower right-hand corner of the keyboard (aA). Scroll to the desired text size and press the select wheel.
Use Kindle's navigation buttons to move within your content:
You can navigate inside your book or periodical by selecting locations from the menu. The top portion of the menu contains options to navigate your reading material. You have slightly different options depending on the content you are reading.
If you are reading a Kindle book, the menu contains the following selections:
If you are reading a periodical or blog instead of a book, you see the following menu selections:
Your reading material can contain links to other places in the document. For example, in many books the Table of Contents is set up to link to the content pages. These links are underlined. Select a link using the cursor bar and select wheel to go to the place indicated. Press the Back button to return to your previous location.
Your reading material could also contain external links that take you to websites.
Your Kindle automatically saves your place whenever you stop reading. You can also add bookmarks throughout your content. Bookmarks are indicated by a half-shaded square in the upper right-hand corner of the page. Your Kindle allows you to place a bookmark on any text, and you can find the exact place you marked even if you have since changed text size. Your bookmarks, notes, and highlights are automatically saved in the My Clippings file that appears on your Kindle Home screen.
To place a bookmark: Place the cursor at the top of the page you want to bookmark and click the select wheel. You can also select the Menu option at the bottom of the page and choose Add Bookmark from the menu. A bookmark icon appears in the upper right corner of this page. The icon looks like the corner of the page has been folded over.
To remove a bookmark: Place the cursor at the top of the page that contains a bookmark and click the select wheel. You can also select the Menu option at the bottom of the page and choose Delete Bookmark from the menu. The bookmark icon in the upper right corner disappears.
To view your bookmarks: Select Go to Bookmark from the menu. A list of all your bookmarks appears. Each bookmark shows a location number, then the first line on the bookmarked page. Select a bookmarked location to go to that location.
You can also navigate among your bookmarks by placing the cursor next to the progress bar at the bottom of the page and clicking the select wheel. Small inverted triangles appear over the progress bar to indicate the location of your bookmarks. You can move through them by using the Next Page and Prev Page buttons.
You can highlight text or take notes in your Kindle the way you would use a highlighter or pen on paper. A clipping of the text you highlighted is also automatically placed in your My Clippings file.
To highlight one or more lines: Scroll the cursor to the first line that you want to highlight and press the select wheel. Select Add Highlight. from the menu to mark the beginning of your selection with a horizontal line. Scroll to the end of the passage you want to highlight and press the select wheel. A box appears around your passage.
To remove a highlight: Scroll to any line in the highlighted passage and press the select wheel. Choose
Delete Highlight and press the select wheel. The box no longer appears around the passage.
To add a note: Scroll anywhere in your content and press the select wheel. Select Add Note from the menu that appears and use the keyboard to enter your changes. When you have finished, scroll to Done and press the select wheel.
To edit or delete a note: Return to a note and press the select wheel. Then, choose Edit Note or Delete Note from the menu to carry out the selected action. When navigating through your reading material, passages that contain notes are identified by an icon in the right margin depicting text on a page.
To view your highlights and notes: Select My Notes & Marks from the menu to display all marks you've made in a particular book or other reading material. Each entry shows the location number, then your highlighted passage, and then your notes. You can turn pages in this file just as you would in a book.
To select a highlight or note and view the marked section in your reading, scroll to the desired item and press the select wheel. If you want to return to the location where you were reading before activating the My Notes & Marks view, press the Back button.
Your Kindle also lets you take a "clipping" of the page you are currently viewing much in the same way you would cut an article out of a newspaper. Your clippings, bookmarks, and notes are saved in your My Clippings file.
When highlighting books, a clipping of the highlighted section is automatically placed in your My Clippings file. On most books, you can clip up to 10% of the total text in the title. If you reach the clipping limit, although your highlights continue to be marked in the book itself, the highlighted sections will no longer be added to your My Clippings file.
To take a clipping: Navigate to the page in your reading that you want to clip. Select Save Page as Clipping from the menu. If you only want to save part of a page, simply highlight that part.
To view your clippings: To view a clipping inside your reading, select My Notes & Marks from the menu. If you want to return to the location where you were reading before activating the My Notes & Marks view, simply press the Back button. You can also view your clippings from the Home screen without needing to locate the item from which the clipping was taken. Navigate to the Home screen and open the My Clippings file. This file displays the clippings as well as the title and location of the passage from which the clipping was taken.
The My Clippings file contains all of the bookmarks, highlights, notes, and clippings you have made while reading. The contents of the file are available to read later or to copy to your computer if you want to edit or send them to someone else. The file is stored as a TXT file so you can import it into one of your computer applications.
All of your notes are also automatically backed up on Amazon servers in case you lose or break your Kindle. When you re-download a title that you previously added notes to, your notes and last location read download with it. Your My Clippings file is not stored on Your Media Library.
To delete your My Clippings file: Navigate to the Content Manager from the Home screen menu. Locate the My Clippings file and select it with the cursor. Then choose Remove Selected Items from the menu. On the next screen, confirm that you want to delete the entire file. Deleting the My Clippings file does not remove any notes, bookmarks, or highlights you've made.